The past few weeks I have tried to enjoy the journey, but I will admit I’ve spent a lot of time focusing on starting the steps this week. I’ve been simultaneously nervous and excited to have the top sheet fully assembled so I could begin the quilting phase.
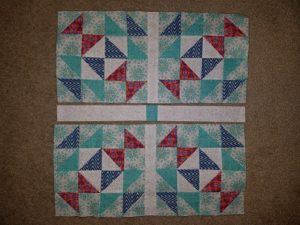 The assembly went pretty smoothly, other than the fact that I could tell each row didn’t line up perfectly.
My first attempt at assembling these two rows together did not go well. I didn’t line the green square in the middle very well and it drove me nuts so I had to take the time to rip the seam and go again. I didn’t get a picture of it all crooked, but trust me, it looked awful.
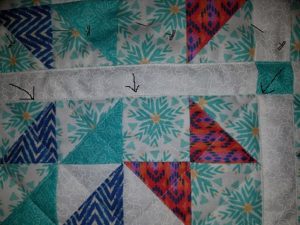
Once they were completely assembled I had to baste. I will admit that when I read the word baste in the instructions and I had no idea what it meant. I had to spend some time on Google to figure out it just meant layering the bottom, batting, and top sheet together. There are two main methods people use, but I didn’t know that going in so I didn’t have the spray all ready to go. Naturally, I went the pin route, but I used T pins because I don’t have the basting pins. I may have to get some because it is no fun to get poked while handling the quilt.
I definitely need some guidance here. Do any of you have any strong opinions on basting?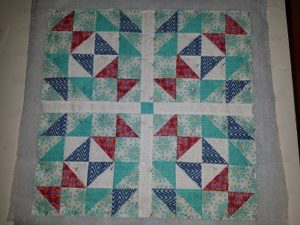
I tried to keep the pins two and a half to three inches apart. The batting I used was just what I had on hand from a non-quilt related project I did last year and it said to quilt within five inches. I figured it is better to over pin than not have enough pins.
Please let me know if you think I should do something differently next time.
Once that was done it was time to start quilting. I’m struggling with this a bit. Mainly because I wasn’t sure of the best route to go. The instructions said to ‘stitch in the ditch’ but the lines weren’t straight so if I followed the ditch the line would zig zag all over the place. It would be hidden, but the back would look weird. I also knew that if I kept the line straight that it wouldn’t follow the ditch at all and could possibly make the front look weird, which would ruin all the work I’ve put in.
Ultimately I decided to go with a straight line. I’m halfway done and I’m not sure how I feel about how it’s turning out.
 On the bright side, the lines are straight. I used my Ideal Seam Guide to stitch. It made keeping a straight line so much easier. In order to make it work I had to put the guide on the fabric itself and not the machine, but I love that it’s possible to do that.
Using the guide makes the process take a little longer, but I think it’s worth the time to use it. 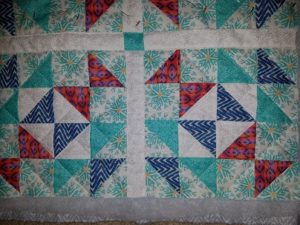
I didn’t want to post the picture of my quilting job. I like having the straight lines, but I hate that some of those lines don’t go through the corners. The overall effect is pleasing to the eye, but if you look too closely it’s a little cringeworthy.
There is one line that didn’t end up very straight. My guide had gotten pretty linty and needed to be cleaned but I didn’t realize how linty it was until I was committed. I had to stop using the guide and eyeball it. It didn’t go well.
 It is a nice visual to show just how helpful the guide was for me. The back is the best indicator on how straight the lines are. There is an optical illusion of wavy lines because of the blue pattern, but they are straight.

The back is also the part that makes me glad I chose to go straight rather than sewing in the ditch. I’m still not sure I made the right decision, but the back is satisfying to look at.
I just hope I am happy with the finished product once I’m done. That is the goal.
Recent Comments