
 I’ve been eager to get started on an actual project. Practicing is helpful and I’ve learned so much, but you can only sew so many strips before it gets monotonous and starts to feel pointless with no end game in mind.
I had planned on starting with something relatively ‘simple’ like a table runner, which I will do, but for now I have decided to start with this mini quilt kit instead. I was at Jo-Ann’s looking at thread and I saw all of these kits for mini quilts and I just had to get one. I love the idea of doing something on such a small scale and learning how to do everything, including the binding at the end.
I’ve also always loved having directions to follow. I’m hoping one day I’ll feel confident enough to design my own pattern, but for now I will gladly let someone else take the creative liberty.
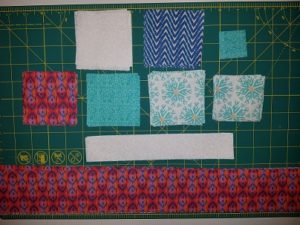
These little kits come with a complete set of instructions, a list of all the tools you’ll need, and all of the material you need. The trick is making sure you read all of the instructions before you start so you don’t get ahead of yourself and do something that you weren’t supposed to do.
For example, this kit specifically says not to wash the material before cutting it. I know that goes against the general rule for quilting, but I’m going to do what it says and hope for the best. They do include instructions on what to do if the material bleeds when you finally do wash the finished product. I’m hoping those directions won’t be necessary.
I had to press the material before I could cut it. It’s in the instructions but also just plain necessary as it was all folded up in the packaging and had some pretty significant creases.
 Cutting the material was interesting, but not difficult. It took time to make sure I got the edges straight and that I was getting the correct measurements but I did it.
I ended up with sixteen 2 1/2″ squares, forty-eight 3″ squares, one 1 1/2″ square, four 1 1/2″ x 8 1/2″ strips, and three 2 1/2″ x 42″ strips.
Sewing the squares together has been very satisfying. I know there are many different techniques that are available for sewing on the bias, but I must say I really like the tip the kit had me use.
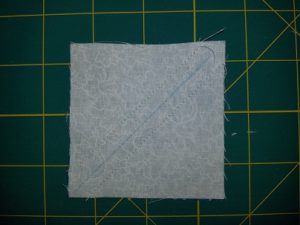 I had to draw a diagonal line down the wrong side of the white squares and then place that on top of the blue square. I then proceeded to sew a 1/4″ seam on either side of the line.
Once that was done, I just had to cut the line I had previous drawn and then press the seam towards the darker material. I know that part is pretty standard.
Once it was pressed I just had to trim it down to a now 2 1/2″ square.
Not to toot my own horn, but look at those corners! Have you ever seen two pieces come together in such a perfect point before??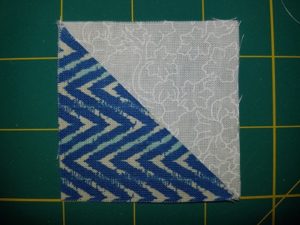
Okay, I’m sure you have, but this is my first time sewing on the bias and I must say, I rocked it.
So far I have completed sixteen squares, which means I have thirty-two more to go! I know what I’ll be doing the next couple of days.
What other tricks do you have for sewing on the bias? Is this a method you use or would you recommend I try something else in the future? I know I’m a fan, but that doesn’t mean there isn’t another technique out there I’d like even more. I want to learn them all.

Recent Comments